


Think you've perfected your Reese Bass sound design? Maybe you can still learn a thing or two from these advanced Reese Bass techniques.
If you've listened to any electronic music over the past 30 years, you'll have inevitably heard a Reese Bass. You may have even used the infamous bass sound in your own productions.
There are plenty of Reese Bass samples out there, but you might want to take total control over your low end by synthesising your very own Reese Basses. In this article, we'll dig into who made the first Reese Bass and how to create your own, before sharing four advanced Reese Bass techniques.
What is a Reese Bass, and Where Did it Originate From?
The Reese Bass is a distinctive bass sound, popular in a range of genres, such as Jungle, Drum and Bass, UK Garage, House, Breakbeat, and many other styles of electronic music. The bass sound is characterised by a deep but raspy tone and a beating, modulating effect that creates a sense of movement.
The Reese Bass originated from the 1988 track Just Want Another Chance, by Reese, which was an alias of renowned House producer Kevin Saunderson. Since then, countless artists from all corners of the electronic music scene have sampled, recreated, and emulated the unmistakable bass tone.
How to Make a Reese Bass
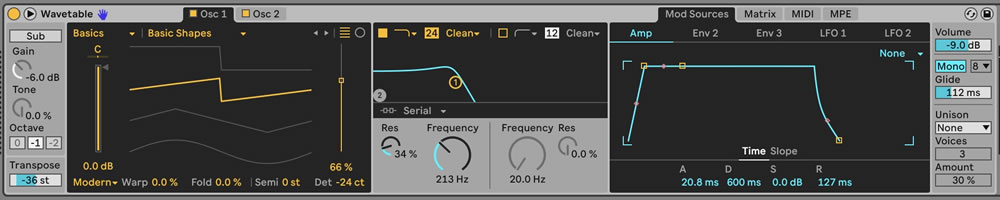
Saunderson allegedly used a phase distortion synth called a Casio CZ-5000 to create the original Reese Bass, but we just need a simple subtractive soft synth with two or more detunable oscillators. For us, Ableton Live's Wavetable device fits the bill.
As we're creating a bass sound, let's first place our soft synth in monophonic mode so that it will only play one note at a time. We've also introduced around 100ms of glide, as this is a common characteristic of the Reese Bass. Another common characteristic is its long-held legato notes, so we've set the amplitude sustain to 100%, while setting the attack to around 20ms and the Release to around 120ms.

Next, set both oscillators to a sawtooth wave, then detune them in opposite directions by around 25 cents. This causes the two oscillators to go in and out of phase with one another, thus creating the distinctive 'beating' sound that the Reese Bass is known for. Detuning by higher values will result in faster, more extreme beating, while lower values result in a slower, more subtle effect.
At this stage, your sound should contain a lot of harmonic content, which isn't true to the classic Reese Bass sound. To remedy this, use a low-pass filter to remove those upper harmonics. The exact cutoff frequency will depend on the notes and register you're playing, along with the characteristics of the filter you're using, and of course, the kind of sound you're looking for. For us, a low-pass filter with a slope of 24dB per octave and a cutoff of 200Hz put us in the right ballpark.
You should now have a classic Reese Bass patch that you can save, ready to use in your next project. If you want to create a Reese Bass with more movement and character, read on.
Four Advanced Reese Bass Techniques
We'll now go through four advanced techniques that you can use in any combination to give your own Reese Bass patches a unique edge.
1. Add Filter Keytracking for More Animated Basses
We're kicking things off with a simple way to give your Reese Bass more interest and animation. Filter keytracking refers to the relationship between the played note and the filter cutoff. For example, positive filter tracking means higher notes result in a higher cutoff value, and therefore a more 'open' sound.
Some synths have a dedicated keytracking control or switch, whereas others, such as Wavetable, you need to use the MIDI matrix to set it up manually. Open the MIDI matrix tab, click on the filter Cutoff control so that it appears in the matrix, then increase the value in the Key lane.
Try playing a low note followed by a high note to hear how the note played affects the filter cutoff. As always, the exact value you should use will depend on the synth, notes, and register you're using, as well as the sound you want to accomplish. Once you've set up keytracking, try to transpose one or two notes at the end of a phrase up by an octave. This helps to add interest and impact to your bassline, and signifies the end of the section.
2. Add Filter Modulation for a Synced Beating Effect
As we've already discovered, traditional Reese Basses have an inherent beating effect due to the way the two oscillators are detuned from one another. We can take this movement a step further with synced filter modulation.
This time, we'll be using Wavetable's Modulation Matrix and an LFO to modulate the filter cutoff. Open the Mod tab and click on the filter Cutoff control again to show it in the matrix, then slightly increase the value in the LFO1 lane.

Now we need to set up the LFO appropriately by opening the LFO1 tab, switching on Sync mode, and selecting a triangle LFO shape. We've then set the Rate value to 3/16 and slightly dialled back the modulation Amount. You can use whichever LFO shape and rate values work for your own bassline, though.

Some synths, including Wavetable, allow you to add some attack time to the modulation. This means the modulation is introduced gradually rather than as soon as a note is pressed. Try experimenting with the modulation attack time so that the modulation is only audible towards the end of longer notes, resulting in a more interesting and dynamic bassline.
3. Split the Sub for a Wide but Mono-Compatible Reese Bass
Currently, our Reese Bass only contains information in the centre of the stereo image, and is therefore mono-compatible. But as can be seen in Ableton Live's Spectrum device, the bass patch contains frequency information from 50Hz all the way up the frequency spectrum.
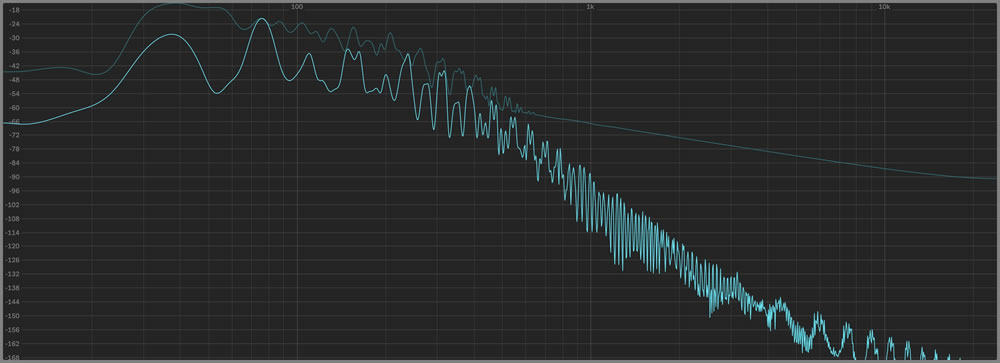
As a general rule of thumb, we want to keep our sub bass in mono, but that's not really necessary for information above approximately 120Hz. By splitting the sub and upper harmonics into separate channels, we can apply stereo widening to the upper harmonics without sacrificing the mono compatibility of our sub bass.
We'll be using Ableton Live's Instrument Rack to achieve this, but you can do the same thing by duplicating your bass MIDI onto a new MIDI channel. Load another simple soft synth onto your new chain or MIDI channel, select a sine wave, and set the amplitude envelope ADSR to match that of your first synth patch. Now go back to your first synth patch and add a high-pass filter with a cutoff of around 120Hz.

Now that you have the sub-bass and upper harmonics on separate channels, you can add stereo processing to the upper harmonic channel without causing unwanted phase issues to your sub-bass. Choruses, reverbs, and phasers can all add further depth, movement, and excitement to your Reese Bass. In this case, we've used Wavetable's Shimmer Unison Mode to thicken up the sound and add some stereo width.
4. Add a Perfect Fifth for Extra Harmonics
We can take the concept of layering a step further by duplicating the main bass chain in our Instrument Rack, or duplicating the Reese Bass patch onto another MIDI channel along with the same MIDI.

Within your chosen synth, transpose the patch up by 19 semitones, which is a whole octave plus a perfect fifth. This gives you a rich, harmonic tonality, and will also make it easier to hear your bass on smaller playback systems.

You may need to tweak the level, filter cutoffs, and additional processing of each layer in order to clean them up a bit and give them their own space within your mix. You can also try automating the level of different layers throughout your arrangement to maximise their impact. For example, try muting the sub bass during build-ups and breakdowns, and only introducing the perfect fifth layer during the second half of the chorus.
The classic Reese Bass is a popular sound, and while there's nothing wrong with keeping things traditional, these four advanced techniques will help you to spice up your patches and set your low end apart from the crowd. If you're looking to level up your sound design, you can also apply these techniques to other synth patches.
Or if you'd prefer to work with pre-made Reese Bass samples, check out some of the royalty-free Jungle and Speed Garage sample packs and synth presets on the Sample Market web store.
