Level up your productions with these advanced ways to use reference tracks.
You might be familiar with the use of reference tracks during the end stages of producing a track, or more specifically, during mixing and mastering. But did you know that reference tracks are a great way to find new inspiration, beat writer's block, and generate new song ideas? In this article, we explain how you can make the most of track referencing with a few innovative tips, tricks, and concepts.
What are Reference Tracks?
In music production, reference tracks refer to songs that an artist, producer, or engineer uses in order to ensure their own productions meet a desired sound, quality, or characteristic. Generally, producers choose a reference track in a similar style or aesthetic to their own song, as this gives them a more relevant target to aim for. While it's very common to use reference tracks during the mixing process, they are hugely useful resources in many other stages of music production too.
How to Set Up Reference Tracks
You might be thinking that setting up reference tracks is as simple as dragging a stereo file into your DAW. While that is the first step, it's not quite as simple as that. Below, we explain how to set up your reference tracks for consistency and simplicity.
1. Set the Audio Routing
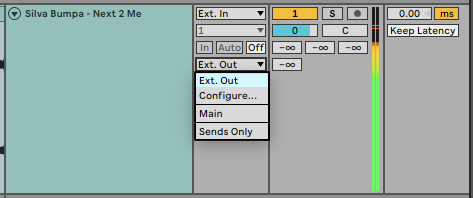
With your reference track loaded into a new audio channel in your DAW, you now need to route the channel's output appropriately. Your reference track has probably been mixed and mastered already, so you'll want to avoid applying any further mix bus or mastering processing that might be on your DAW's master channel.
Each DAW handles audio routing differently, but you should be able to route your reference track's output so that it bypasses your master chain. In Ableton Live, it's as simple as setting the channel's output to Ext. Out.
2. Assign Custom Keyboard Shortcuts

This next step isn't totally necessary, but we highly recommend it to supercharge your track referencing workflow. Most DAWs offer the ability to set up custom keyboard shortcuts, which can be a real time-saver for tasks that you do repeatedly.
In the case of reference tracks, mapping an unused key on your keyboard to the Solo button of your reference track is a huge efficiency hack. In Ableton Live, turn your reference track's channel off by toggling the Track Activator button off. Then press CMD/Ctrl + K to enable key mapping, click your reference track's Solo button, then press the key you want to map it to. Pressing that key now solos your reference track, and you can map multiple buttons to multiple reference tracks if you're using more than one.
3. Level Match Your Reference Track
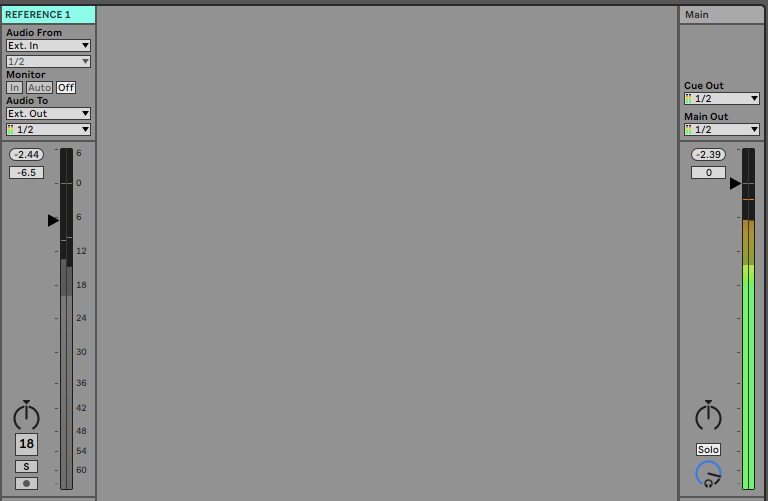
In step one, we showed you how to ensure you're not applying any unwanted processing to your reference track. Now it's time to check that the levels are set appropriately. As we mentioned, your reference track should be a fully mixed and mastered production, so it's probably louder than your work in progress.
As humans, we inherently prefer music when it's played louder, so it's crucial to match the levels of your own production with your reference track to avoid any bias. Loop the loudest part of your track and check the master channel's meter to see how loud it's peaking. Make a note of the peak level, then solo your reference track and loop the loudest part of that.
Now bring the reference track's level down to -∞, and then slowly bring the level back up until it peaks at the same level as your own production. You should now be able to switch between your own track and your reference tracks without any noticeable change in overall volume.
4. Tempo Sync Your Reference Track
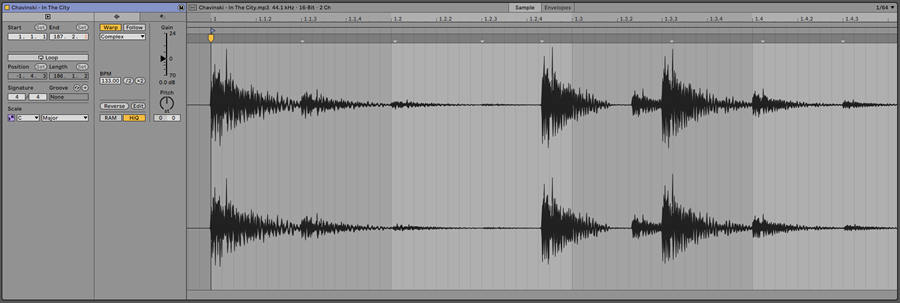
This next step is optional, but it will help to create a more cohesive and accurate track referencing experience. By setting your reference track to the same tempo and phrasing as your project, you can smoothly switch between audio sources. This will allow your ears to focus on the actual sonic characteristics rather than trying to figure out the timing of the two songs.
Again, the process for this differs from DAW to DAW. In Ableton Live, double-click on your reference track to open the Clip View, enable Warp and the Complex warping algorithm, then type the reference track's original BPM into the BPM field. You may need to adjust the position of the grid by right-clicking on the warp marker on the first beat of the first bar, and selecting Set 1.1.1 Here.
How to Use Reference Tracks to Find Musical Inspiration
With your track referencing set up in your DAW, let's explore how you can use your reference tracks to fuel your creativity.
1. Follow the Energy
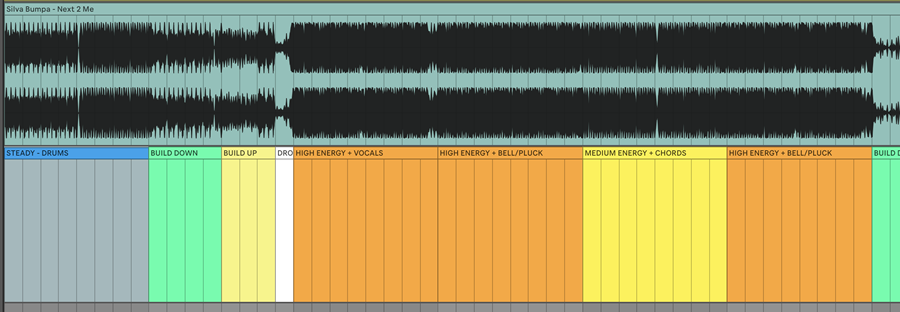
Perhaps you're already using reference tracks to map out the structure and arrangement of your own productions. After all, it is a great way to direct you on which elements to introduce, when to introduce them, and how long each section should be. But we can take this even further by really considering the energy levels at each point in our reference track.
Try to map out the energy levels during each section of your reference track, noting when the energy levels change and what causes that change. For example, the kick drum may be dropped out towards the end of a section to create more impact in the next section, or an additional hi-hat might be added halfway through a section to maintain interest.
You can rename dummy MIDI clips to do this, or there are Max4Live devices or even plugins that allow you to make more in-depth notes within your DAW's project. This is particularly useful if you're trying to break out of the loop and develop it into a full track, or even if you've arranged a track in full, but it sounds stagnant and repetitive in places.
2. Find Complementary Counter-Melodies

Have you ever listened to a song and been able to hum a different melody along to it, or even add a harmony? Try playing additional melodic elements while you listen to your reference track, or if you're not comfortable playing new melodies yourself, try and find some loops that suit the reference track, and then chop and arrange them in a way that complements it.
If you're looking for loops to help you find musical inspiration, check out our huge catalogue of professional sample packs, many of which contain key and BPM-labelled loops that are ready to be dropped into your project.
Once you've built up a suitable accompaniment, you can unsolo the reference and start developing the parts you added into your own original creation. This is a great trick for beating writer's block and creating song starters that already have a defined key, movement and groove to them.
3. Borrow the Groove

Much like the example above, you can use reference tracks to inspire the rhythm and groove of your own tracks. Writing and then muting drum parts that work with your reference track's existing drums is a great way to kick off the drum programming of your next track (no pun intended).
Again, if you're more accustomed to working with loops, then go ahead and drop some into your project, then edit and arrange them in a way that works with your track. Unsolo your reference track, and you should be left with the beginning of a beat that you can continue to develop.
If you're working in Ableton Live, you can even use the exact drum groove from your reference track using the Extract Groove(s) function. To do this, highlight a 16-bar section of your reference track, right-click on the audio clip, and select Extract Groove. The groove will now be showing in your Groove Pool, ready to be adjusted and applied to the elements of your production.
4. Adjust Timing, Pitch, and Direction for Even More Inspiration
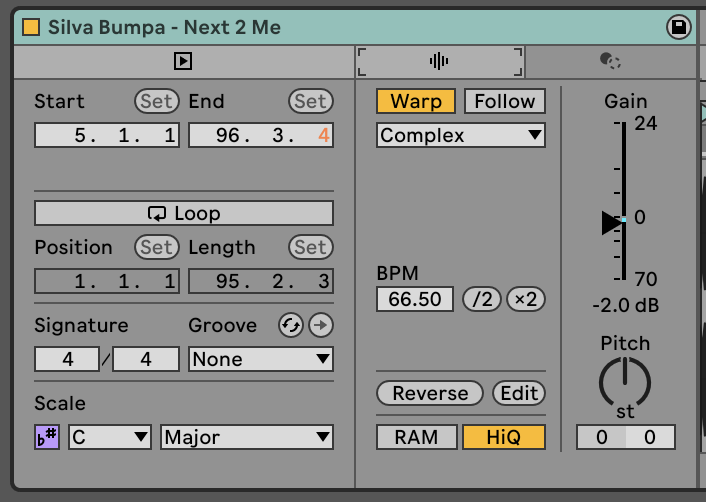
If you've exhausted the techniques above or just want to try and find even more inspiration from your reference tracks, try adjusting the timing, pitch, and direction of them. In Ableton Live, this can be done with ease in the Audio Clip view.
For example, if you want to create Breakbeat, try slowing down a Jungle track from 160bpm to around 135bpm and see if this sparks any new ideas for how you can chop and program breakbeats within your own productions. In most DAWs, you also get the option to halve or double the tempo of an audio clip. This can create some unexpected results.
Similarly, if you like the melodic components of your reference track but are struggling to write original counter-melodies that sound different enough, try pitching your reference track up or down by a few semitones.
Finally, if you're feeling particularly adventurous, you can try reversing the entire reference track to see if any new melodies, rhythms, or textures start to pop out at you. Something really interesting happens to audio when it's reversed, and listening to a track you know well in reverse might spark some creative new ideas.
Now that you've learnt how to use reference tracks to kick-start new song ideas, why not add some new samples to your collection to further fuel your inspiration? Head to the Sample Market store to find melodic, bass, vocal, and drum loops for a range of electronic music styles.


